Hi again to all of you ZAURUS readers. As some of you noticed (and emailed me your disappointment), I didn't publish an article in February. I was busy travelling in January (with my Zaurus) and I missed the publishing deadline.
It is my pleasure to once more describe another set of the Zaurus applications and how I use them. I will describe the SEARCH and part of the ACTIVITIES applications.
The SEARCH Application
The SEARCH application does a global character by character search according to the parameters specified and places temporary pointers to entries that are found. The information itself is not copied or duplicated anywhere. The SEARCH application is accessed by double touching the icon on the left side bar of my Zaurus 5700. The menu shown in the screen below is the result after I picked the first search option of "Only Entries Containing:" the text string "BOOK". I excluded birthdays, holidays and outlines from the search areas by one-touching their respective boxes on the lower portion of the screen. The remaining application areas are highlighted and all of the data in them was searched for the string "BOOK". While I have used only one word in this search example, I can use any string containing a maximum of 16 characters in total, including blanks.
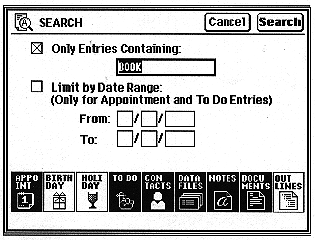
Figure 1: SEARCH Application: "Only Entries Containing" Menu
After one-touch of the Search Button at the top right of the screen the Zaurus did its search. I have a total of 500K of memory used, with about 1500 entries of various kinds. The BOOK search only took 15 seconds to return 25 entries on the screen show below.
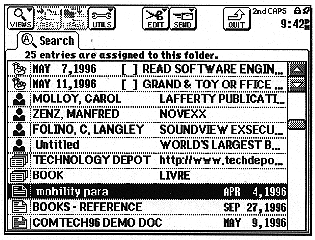
Figure 2: Result of Executing SEARCH for 'Book' Word
As you can tell from the results, I love BOOKS (as well as Zauri)! This screen is actually part of the FILER application. SEARCH assigns the entries found to a special permanent folder belonging to FILER labelled "Search". This can be seen on the tab on the upper left part of the screen. I have scrolled the window part way down using the touch pen to drag the slider down on the right. On the left side of the screen you can see the icons that indicate which application the entry belongs to. You will see TO DO, CONTACTS, DATABASE and DOCUMENT entries. To access any of the entries a double-touch will send me into a detailed view of the entry itself. If I want to look at another entry, I one-touch the FILER icon on the left side bar of the display, and I am then back into the SEARCH results folder. The links in this folder will remain until I empty it using the FILER utilities or until I do the next global search.
You can see from the first screen above, that a second search option is "Limit by Date Range". If I touch it's square box, the search will be restricted by my specified From and To dates.
I use the SEARCH application quite frequently for various purposes. I have a habit of putting 'key words' in the different records / entries of the various applications. This gives me a simple way to access information as though it were indexed. However, there is no special indexing step or utility required. I use this special folder and technique to have my favourite key word index always at the ready.
Within the applications themselves there is a default search mode that is a subset of the global SEARCH application talked about above. I won't go into details about those searches, since they are associated with each specific application. I use both search methods regularly, depending on what I want to accomplish.
ACTIVITIES
Now, I will describe ACTIVITIES, the most commonly available and used application in all electronic organizers, PDA's and KPDA's. As with the other Zaurus applications, ACTIVITIES is simple to use. However, it is extremely powerful with lots of options, features and views. Zaurus ACTIVITIES include the following sub-applications: appointment index, birthday/anniversary index, holiday index, to do index.
A description of the Appointment sub-application follows. The screen below is the Appointments screen displayed with a "Day" view.
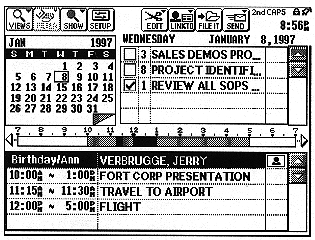
Figure 3: ACTIVITIES Application: Appointment Sub-Application
By one-touching the "VIEWS" icon on the top of the screen, a drop down list appears with the following items in it: Year, Month, Week, Weekly Graph, Day, Appointment Index, Birthday/Ann Index, Holiday Index, To Do Index, Details. These give different ways of viewing and accessing the data. I will come back to this in more detail, but first let me briefly mention the remaining Icons across the top tool bar.
The next available icon to the right is "SHOW". It contains a drop down list with the items: Today, A Specific Date.
The next icon is "SETUP". It pops up a screen that allows me to set the default view to either Day, Week or Month. I have mine set to Day view. This screen also lets me set the date format to Month/Day/Year or Day.Month.Year. This screen also lets me set the month format of either Sunday - Saturday or Monday - Sunday.
The next icon is "EDIT". It has a drop down list with the following items: New Appointment, New Birthday/Ann, New Holiday, New To Do, Revert to Saved [Cancel], Delete Entry, Delete Group, Cut, Copy, Paste, Secret Entry, Normal Entry. I use Delete Entry and Delete Group for conveniently erasing past single events or groups of events that I no longer want to keep.
The next icon is "LINKTO". It contains the drop down list of Contacts, Data Files. This allows me to link an entry to an item in the CONTACTS or DATA FILES applications. This is a convenience feature to link one entry to another. It is a good feature, that I don't use very often in my work.
The next icon is "FILE IT". One-touch of it sends me into the FILER application. FILER allows me to organize entries into various 'file folders'. I plan to describe FILER in a future article.
The last icon is "SEND". It contains the drop down items of Unit to Unit, Print. The Unit to Unit item will pop up its own screen with options to send data from one Zaurus to another via the infrared channel or via a serial cable, and then transfer the data. The Print option will pop up its own screen with options for picking a printer and its interface, and then do the print job.
Now, please refer back to the activities screen above. The Day view for activities is what I use the most. It allows me to see in one screen the greatest amount of information that I commonly need. First, I will point out some items of the screen. One item to note is the square box around Jan. 8, the current day in the month calendar in the upper left quarter of the screen. The day showing in the top right portion of the screen is the date of the activities details being displayed. This date flashes on and off in the calendar part of the display. The "PREV' and "NEXT" key can be used to scroll through the day view, one day at a time. To go to a specific date, a simpler way is just to one-touch the date desired in the calendar portion of the screen. Another item is the 2 forward and back triangular tags on the lower right corner of the month portion of the screen. These can be use to scroll forward or back through the months in this day view. The fastest way to get back to the current date is by one-touching the SHOW icon in the top menu bar. It drops down "Today" and "A Specific Date...". One touch of "Today" puts me back to today in the Day View. This view allows me to pick many other views by one-touching on the appropriate area of the display such as the year, month, week bar, specific day and to do item.
Across the middle of the screen is a horizontal appointments hour bar showing in graphic form the appointments and hours from 7 am to 7 pm. Appointments that I have set for that portions of the day show there as cross hatched areas. This bar can be scrolled either way by one-touching the triangles at either end of the bar. The solid areas denote overlapping appointments. Zaurus obviously allows me to do this, but it also warns me with a message flashed on the screen at the time I saved the new appointment. The text summary of the appointments are shown in the bottom third of the display. The details of any given appointment can be popped up by double- touching the appointment in this portion of the display. Another way I can pop it up is by picking "Details" from the drop down list of the VIEWS icon. Once in this detail view I can edit any of the details of the appointment by using the pen to one-touch them and then enter the changes on the keyboard.
I use the horizontal hour bar most often to schedule new appointments. By one-touching on the bar and dragging the pen along it initiates a new appointment and pops up the detailed view with the times already filled in. I then type in details of the appointment, set the alarm time by one- touching its square and save the entry away, by hitting the ENTER key. Usually I will adjust the alarm time to the appropriate number of minutes ahead of the start of the actual appointment. If I have to drive from where I am, then I allow for the time to get there. If it is in the same building as I am, then 5 minutes to stop what I am doing, pick up my files etc. is all that is needed. There are other less efficient ways to initiate a new appointment such as hitting the NEW ENTRY key on the keyboard or picking "New Appointment" from the drop down list of the EDIT icon on the top tool bar. Occasionally I will use these to quickly set an appointment that is being requested by someone else on a specific day in the future. If I double book this way, Zaurus will alert me when I go to save it and then it pops up the details of that day to show me the problem.
Birthdays/Anniversaries for the day automatically show in the lower portion of the screen. On the screen above, it was reminding me that January 8 is the birthday of my next oldest brother. I have a habit of calling my brothers and sisters on their birthday. My telephone call is one little thing I do to carry on the tradition that our mother had of doing something special for each of us on our birthdays. It is a small, but important part of my personal life that my Zaurus allows to me to look after simply and reliably.
There are several other views that can be used to enter, view and edit data. The next screen below shows the "Appointment Index". This is a text list of the appointments in order by ascending date.
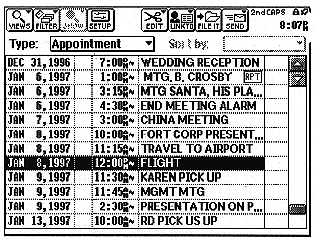
Figure 4: Appointment Index View
I use this format sometimes if I want to go back and look for various things about the last appointment I had with someone. In the details part of the appointment, I will usually be able to find what I am looking for. One little helper that is available is the RPT in a square box, shown to the right in the first Jan.. 6 entry. This indicates a repeat entry. Although I haven't described this feature elsewhere, REPEAT is a convenient, flexible and efficient way to schedule regular appointments.
The next screen below is the "Weekly Graph" view.
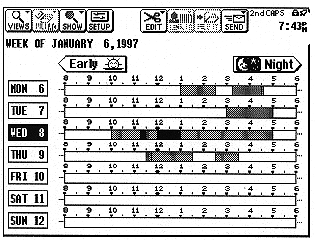
Figure 5: Appointments Weekly Graph View
This is a series of horizontal hour bars similar to the one in the Day view that I discussed earlier in this article. I use this view most often when I am trying to schedule something for the week at hand or the next week. It is a good view for spacing out my appointments, when that is possible. I can enter appointments directly from the bars in this screen, if I choose to, in the same way as described above.
The screen below is the "Week" view. It gives the week in summary text form. I use this view the least of all. I can go to a day view, by double-touching anywhere inside the square for a day.
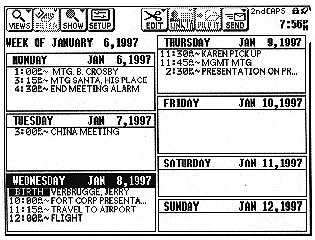
Figure 6: Appointments: Week View
The last screen below is the "Month" view.
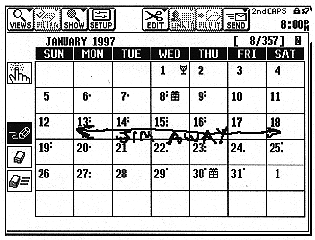
Figure 7: Appointments: Month View
A neat feature here is the ability to write on the calendar with the touch pen, in the same way as most people do on a paper calendar. It is a quick way to record a block of time such as vacation, person away, etc. These notes remain purely graphical and don't show up anywhere else. Various icons show up beside each of the days in this view to indicate the type of activities associated with those days. For instance, January 1 shows up as a holiday. One of my brother's birthday is January 8 and another brother's birthday is January 30.
A "Year" view is available also to show a complete year.
Birthday/Anniversary Index, Holiday Index and "To Do's" are part of the ACTIVITIES as mentioned earlier. However, I will leave them for one of my next articles. For those of you that have a Zaurus KPDA, happy Z'ing. I hope this article has given you some new ideas and allows you to wring some more performance out of your Zaurus. For those of you dreaming about owning and using a Zaurus, collect up your pennies, make yourself an excuse why it is essential, find a Z store, make your dream a reality, start Z'ing and then tell me about it!
Please feel free to email us at support@peeltech.ca with your comments, Zaurus questions or your PDA story.
